The objective of this blog is to provide a clear, step-by-step guide to creating security roles and privileges in Dynamics 365 Finance and Operations (D365 F&O) using the Security Configuration workspace. This helps ensure that users have access only to the data and actions they require, enhancing system security and compliance.
Key Definitions
- Role: A collection of duties and privileges assigned to a user to control their access in the system.
- Duty: A group of related privileges representing a part of a business process.
- Privilege: The lowest level of access control. It defines access to a specific object, such as a form, report, or action.
Step-by-Step Guide to Create Roles and Privileges
Navigation Path:
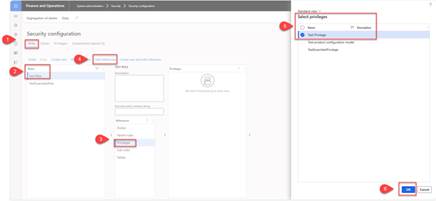
System administration → Security → Security Configuration
Steps to Create Privilege, Role & Assign to User
Step 1: Identify the Form
- Determine the Form Name or Menu Item Name (used in privileges).
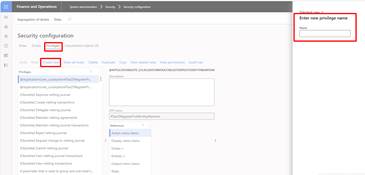
Step 2: Create a New Privilege
- In the Security Configuration, go to the Privilege tab.
- Click Create new.
- Enter a Name for the new privilege.
- Click Save.
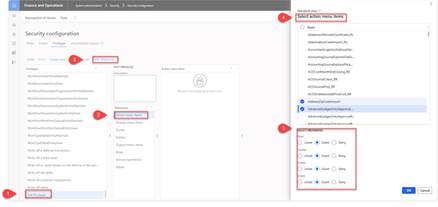
Step 3: Add Action Menu Item Reference
- Inside the newly created Privilege, go to the Reference section.
- Navigate to Action Menu Item.
- Click Add Reference.
- Use the Form Name to find and select the relevant Action Menu Item.
- Set Access Properties to Grant for:
- Read
- Update
- Create
- Delete (as required)
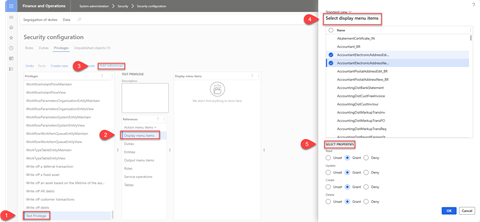
Step 4: Add Display Menu Item Reference
- Still in the Privilege → Reference section.
- Select Display Menu Item.
- Click Add Reference, search by Form Name, and select.
- Set Access Properties to Grant for:
- Read
- Update
- Create
- Delete (as needed)
Step 5: Create a New Role
- Go to the Roles tab.
- Click Create New.
- Enter a Role Name.
- Click Save.

Step 6: Assign Privilege to Role
- Inside the newly created Role, go to the Privilege section.
- Click Add Reference.
- Select the Privilege you just created.
- Click OK.
Step 7: Publish Security Objects
- Navigate to the Unpublished Project (top of Security Configuration form).
- Select all unpublished items (role, privilege).
- Click Publish All.

Step 8: Assign Role to User
- Go to: System administration → Users → Users.
- Select the desired User ID.
- Click Assign Roles.
- Select the newly created Role.
- Click OK.
Done!
Your user now has access to forms/actions as per the custom role and privilege.
Conclusion
Managing roles and privileges in D365 F&O is vital for ensuring secure and streamlined access control across the organization. This is manageable from the front end in D365 F&O.
By following the above steps, system admins can create and assign custom roles that align with business needs and security policies.
FAQs
Q1: Can I assign multiple privileges to a single role?
A: Yes, a role can include multiple privileges (and duties) depending on the access requirements.
Q2: What is the difference between Display and Action Menu Items?
A: Display menu items open forms in read/write mode, while action menu items trigger processes or operations.
Q3: Are changes published immediately?
A: No, changes must be published manually in the Unpublished Objects section.
Q4: Do changes affect existing users immediately?
A: Yes, once a role is assigned to a user and published, the new permissions are effective immediately.
Q5: Can we create roles and privileges from the front end in D365 F&O?
A: Yes, we can — by following the steps mentioned above.
Caption
Mastering Security in Dynamics 365 F&O!
If you’ve ever wondered how to create custom roles and control user access in #D365FinanceAndOperations, this step-by-step guide is for you.
- Create Privileges
- Assign to Roles
- Publish & Assign to Users
- Secure your environment confidently
Whether you’re a Functional Consultant or a Technical Architect, this breakdown makes managing security simple and clear.
✍️ Blog curated by the MindCurve Training Team With special thanks to Akhilesh Maurya, Consultant – Microsoft Dynamics 365, for contributing insights based on real-world implementation experience.
📧 For implementation support or tailored consulting, reach out via 3E MindCurve Private Limited